< Previous | Contents | Next >
![]()
![]()
![]()
Please refer to the item (How do I) Manage Selected Content inside a Session? (Section A.2.7).
![]()
![]()
Importing files implies copying them into the TriCaster session folders, making them
local (rather than external). To import media files:
1. Open (or create) a TriCaster session.
2. Click the Manage icon in the Startup Screen’s Session Page.
3. Click the Import Media button (below the Browse list).
4. Use the Import Media module that opens to create a list of files you wish to import into the current session, and click the Import button.
Hint: You may know that external files can be used in a session without being imported, by adding them to Media Player playlists using the “Add Media Location” feature. However, such external files used in a session will not be included in session backups (unless they are deliberately imported during the backup process), nor are they deleted when sessions are deleted.
Also, the transfer speed of many external devices is too slow for reliable playback of large clips, making it wise to use Import instead whenever possible.
![]()
A.4.3 AVOID DELAYS WHEN SESSION MEDIA IS OFFLINE?
![]()
Launching a session when content in Media Player playlists that is served across a network is offline or missing can result in lengthy delays, even making it seem as if TriCaster has ‘hung’.
Normally (i.e., when dealing with local content) the operating quickly reports file status to TriCaster, and missing media is ghosted in the playlist bin. This process is more complicated when dealing with networked media. For example, if a volume is missing the operating system will automatically scan the network in an attempt to resolve the path. After some time, the operating system gives up, and the file is marked as inaccessible. Unfortunately, though, this process now iterates for as many files as you have added to the playlist.
Fortunately, the potential delay involved during this process can be easily bypassed. By default, the system uses a full UNC (“Universal Naming Convention”) path for network resources (e.g., “\\myserver\myfolder\myfile.mov). Use the Windows “Map a Network Drive” feature to give the server (or folder) where your remote media is located a drive letter (e.g, “M:\”, or “M:\myfolder\”). This results in much quicker path resolution, and effectively eliminates the problem.
![]()
A.4.4 SHARE FILES ON YOUTUBE®?
![]()
Although you have opened an account with YouTube® and correctly configured the account (see Section 19.2) for TriCaster sharing, uploading may fail because you have not yet created a YouTube® “channel”.
The basic YouTube® account lets you log in to watch existing content and make playlists. To create a channel, follow these additional steps:
1. Browse to YouTube®, login and click Upload at the top of the home page.
2. Follow instructions to add a channel to your account.
Afterward, TriCaster will be able to upload directly to your channel by means of its
Share Media feature.
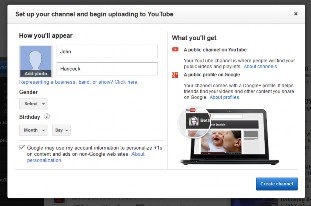
FIGURE 400
![]()
A.4.5 PREPARE CLIPS WITH EMBEDDED ALPHA CHANNEL?
![]()
Probably the best format to use for files with embedded alpha channel for use in TriCaster are those encoded using NewTek’s own SpeedHQ 4:2:2:4 codec. This format can serve for either SD or HD clips, and represents a high quality, moderately compressed alternative. (As a registered NewTek customer, you can download the NewTek TriCaster Codec Pack for either Windows® or Mac® platforms from your personal Downloads page on the NewTek website.)
Apple® computer users have several other options available which support an alpha channel, including the Animation and PNG Quicktime® movie codecs (select “Millions of Colors +” in the codec settings to include alpha in the file).
![]()
A.4.6 ADD AN EXTERNAL FILE LOCATION TO THE FILE BROWSER?
![]()
1. Open (or create) a TriCaster session.
2. Click the Add button for a Media Player (DDR, Still or Title).
3. Click the Add Media Location button at bottom left in the File Browser.
4. Select the folder you wish to list as a location in TriCaster’s File Browser, and click OK.
(See Add Media Location in Section 11.2.2)
![]()
A.4.7 REMOVE A LOCATION FROM THE FILE BROWSER?
![]()
1. Click the Add button for a Media Player (DDR, Still or Title)
2. Right-click the name of the location you wish to remove from the list, and select Remove in the menu that opens.
(See the sub-heading File Context Menu in Section 11.2.2)
![]()
A.4.8 EXPORT FILES TO AN EXTERNAL DRIVE?
![]()
There are several approaches to exporting media files from within TriCaster sessions. By far the simplest is to use the Export Media feature – see the sub- heading by that title in Section 5.3.3.
![]()
A.4.9 IMPORT/EXPORT FILES LARGER THAN 4 GIGABYTES?
![]()
This question may arise if you are using external media, perhaps portable hard drives or USB ‘thumb’ drives. These are commonly prepared using the FAT32 file system, which does not support files larger than 4GB.
As video files will often exceed this size, FAT32 is not very suitable for use in that context. You should reformat these drives using the NTFS system to eliminate this limitation (or you might consider transferring larger files to TriCaster over a network connection).
![]()
A.4.10 REPAIR DAMAGED RECORDINGS?
![]()
At times, a catastrophic event (such as a power outage) that interrupts recording will result in a damaged Quicktime® clip. Generally, such a clip can be repaired by simply adding it to a DDR playlist. (Note that this process depends on the clip being stored as-is within the NTFS file system at all times before repair. Operations like zipping the file, transferring it to a FAT32 drive and then back, etc., will make recovery impossible).
![]()
A.4.11 AVOID THE ERROR “…COPY THIS FILE WITHOUT ITS PROPERTIES?”
![]()
Windows® shows this error message when you export a media file from TriCaster to an external volume that does not use the NTFS file system. The warning is not really a concern (although we highly recommend using NTFS formatted storage, as noted in Section A.4.9). The files will copy just fine regardless.
TriCaster generates metadata attributes for media files for internal use. This metadata is only retained when you export to storage formatted as NTFS. That being said, the metadata is automatically regenerated if you use the files with TriCaster again later, so its loss poses no issue.
![]()
A.4.12 FREE UP SPACE BY DELETING THE DEMO CLIPS?
![]()
1. Go to TriCaster’s Startup Screen.
2. Open a session (it doesn’t matter which one).
3. Click Manage on the icon ring, and click the Clips link at right.
4. Use the system File Explorer that opens to navigate up one level in the folder hierarchy, to D:\Media\Clips.
5. Selectively delete content from the sub-folders you find in this location.