< Previous | Contents | Next >
![]()

The term Matte refers to a black and white representation defining the transparent (background) and opaque (foreground) parts of an image during compositing.
Portions of the matte that are grey are treated as semi-transparent, which is very useful in
progressively smoothing edges between foreground source material and inserted background imagery.
FIGURE 216
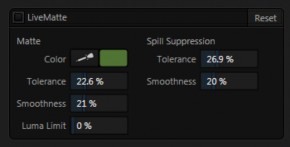
TriCaster’s supplies a digital version of this traditional tool. The controls under the Matte label, as you would expect, allow you to define and adjust the matte for the corresponding video input.
![]()
![]()
Initially, LiveMatte removes a specific color from the foreground image. This color is chosen using the Color button.
To choose this key color, click on the Color button (Figure 217) and keep the mouse button depressed. Drag the eyedropper tool over one of the video monitors to choose the color you wish to remove and then release it. The neighboring ‘color well’ is updated to show the color selected.
![]()
![]()
No physical greenscreen is perfectly comprised of one color. Wrinkles, folds and shadows along with the seemingly inevitable uneven lighting result in difference. For this reason, TriCaster provides a numeric slider labeled Tolerance just beneath the Color picker.
The Tolerance setting allows you to broaden the range considered as the key color, including more ‘near-neighbor’ colors to be included in the matte. A low tolerance removes only color values close to the primary or key color. As you raise the tolerance, you extend the range of values on either side of the primary color that will be treated as transparent. This allows you to deal with those imperfections we mentioned.
On the other hand, it may be that there is (usually unplanned for) detail in the foreground that is somewhat similar to the key color. Reducing Tolerance may allow you to prevent unwanted holes appearing when the subject opts to wear his St. Patrick’s Day tie.
![]()
![]()
Smoothness defines a further tolerance factor, and a very useful one. We want our keyed foreground to blend smoothly into the background – rather than to stand out in hard relief like a postage stamp or decal. Smoothness serves this purpose. Don’t overdo it though, as aggressive settings can cause the foreground to become unnecessarily ‘muddy’.
![]()
![]()
When working with poorly-lit backgrounds (or poor quality footage), the color Tolerance range separating the foreground (talent) from the background can be extremely narrow.
This problem can be aggravated by the subject’s choice of clothing, or when there are harsh shadows. There is often a strong chroma component (and associated chroma noise) in dark foreground areas. The ‘noise’ may be partially or completely transparent when tolerances are critical. Because the noise varies over time, ‘holes’ in the foreground can result, and even worse these may flicker on and off from one frame to another.
LiveMatte’s Luma Limit control makes it possible to overcome this issue. In essence, it restricts the chromakey operation based on luminance (brightness) values. Dark foreground areas which typically cause the problems just described normally have quite different luminance values from the background color. In simplest terms, problem areas of this type can be decisively ‘pulled’ back into the foreground by pre-filtering the chromakey effect around a luminance threshold.
Generally, try to set up the best key you can before raising the Luma Limit from its default value of zero (no effect). Then gradually raise the limit until you are pleased with the result.