< Previous | Contents | Next >
![]()
All of the controls and features just mentioned are located in the PTZ tab, located at left in the lower third of the Live Desktop (Figure 210).
![]()
![]()

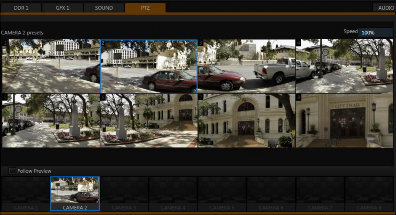
The Camera Bin (Figure 211), located across the bottom of the PTZ tab contains icons for each camera. A camera currently being controlled is denoted by a blue outline. The icons update to show the thumbnail for the preset icon selected above.
Hint: Cameras whose PTZ switches are disabled in their respective Input Configuration panels (Section 8.2.9) show dimmed icons in the Camera Bin, but may still be selected.
Enabling the Follow Preview switch at left in the Camera Bin header will automatically select camera icons for you as these are chosen on the main Switcher’s Preview row.
![]()
![]()
Hint: The number of the current Preset icon is shown in an overlay at upper left. When the actual camera position at the moment does not correspond to a preset, an “M” is shown over the most recent selection, rather than a number.
The large Preset Bin (above the Camera Bin) shows eight thumbnail icons for the currently selected PTZ camera. Click a preset to select it, and the camera automatically begins moving to the new position.
![]()
![]()
FIGURE 212
SPEED
The Speed control in the PTZ tab titlebar governs the rate of change when a new preset is selected.
Camera travel speed capabilities vary widely, so think of this setting as a percentage of the maximum speed your unit can manage.
![]()
![]()
When you roll the mouse over a preset, a configuration overlay (‘gear’) appears in its upper right corner. Click this to display the PTZ Preset Editor (Figure 213).
Initially, preset icons display the default PTZ Canvas representation. When a live source is connected (and enabled in the PTZ tab of Input Configuration), making adjustments causes an image to be grabbed from the live video input. (Click the Update Snapshot button to update without closing the Preset Editor).
NAVIGATING IN THE PRESET EDITOR
![]()
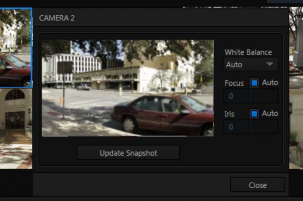
While you will likely use the control surface joystick for most purposes during production (see Section 12.1.4, the canvas in the PTZ Preset Editor panel also provides ‘trackball-like’ control over pan and tilt for connected cameras using the mouse.
Simply drag horizontally or vertically on the canvas to pan or tilt. The mouse-wheel provides zoom control.
Hint: If no camera is connected, a virtual display updates to simulate rotation and zoom as you navigate, but you may well prefer to connect a camera and assign it to Preview, checking the output the camera on a larger monitor while making adjustments.
CAMERA SETTINGS
![]()
Some further camera settings are grouped together just to the right of the Preset Editor’s Canvas. The White Balance menu offers three options – Auto, Indoor and Outdoor. (This is a global setting, and affects all presets for the selected camera.)
By contrast, the Focus setting, and the state of its Auto switch are stored individually in each preset. This is also true for the Iris setting, and its Auto switch.
![]()
12.1.4 PTZ AND THE CONTROL SURFACE
![]()
Pan, tilt, zoom control, and several settings for connected robotic cameras are also directly supported on several NewTek control surfaces. See Chapter 22, Control Surfaces for details.