< Previous | Contents | Next >
SECTION 10.1 INTERFACE AND MULTIVIEW
Really, TriCaster provides two multiview monitor displays – one right on the Live Desktop (a.k.a., the “Interface”), normally comprising its upper third, and the other |
a fully independent display presented on a secondary monitor output labeled Multiview on TriCaster’s rear connector panel.
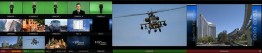
FIGURE 169 |
FIGURE 170 |

As we saw way back in Section 4.4.2, the overall layout of each of these multiview monitoring areas is governed by two Workspace presets.

10.1.1 WORKSPACE PRESETS

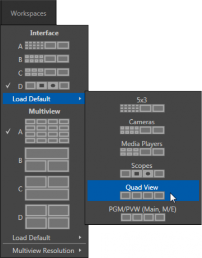
TriCaster provides powerful Workspace options. Freely switch from preset A to B to C to D for either Interface or Multiview, customize the display shown, recall it at a moment’s notice, or reset it to a default layout using Load Default.
Each viewport in any layout offers diverse input or output source options, and can be further modified to produce just what you need.
As you’d also expect, the settings you select for individual monitors are retained in the current Workspace preset.
FIGURE 171

Note: The external Multiview has an menu that lets you choose a Resolution supported by the display device you connect. Select the native resolution of the external display device for best results. Changing Multiview output options can cause frames to be dropped, so modifications during live production are discouraged.

Let’s consider the optional settings at your fingertips for individual monitor ports.
VIEWPORT OPTIONS
Right-clicking a monitor viewport opens a context menu. The first option group governs the monitor’s source.
FIGURE 172
In addition to the external video inputs (including Network sources), you can assign the output of Media Players; M/Es; main Program output
(including DSK channels and effects); Program (Clean) without; the main Switcher’s look ahead Preview; another Preview showing M/E source B output (Mix mode only); or Output 1 or 2.
Several special displays are also available.
Selecting the Clock item replaces the video display with Event Clocks showing current time or LTC timecode along with countdown style Start and End clocks (see Section 8.4.3). The Custom Image feature lets you display a network logo.
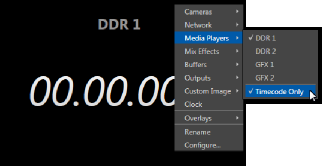
FIGURE 173
A further display you may find useful is the Timecode Only option that appears at the bottom of the Media Players sub-menu.
This alternative displays a counter showing the current position of the playhead in the Media Player. The display respects Reverse Direction and Warning Colors options, too.
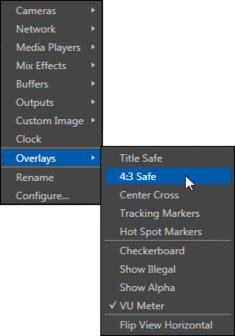
Below the basic source selection options in the menu, you’ll find another group that provides access to optional Overlays for the monitor port.
Available overlays include Checkerboard (shows a checked pattern wherever transparency exists in the source); Title Safe (note this is a 4:3 format safe margin); 4:3 Safe (a true 4:3 frame edge boundary), Center Cross to help with alignment, and Show Illegal and Show Alpha.
FIGURE 174

In addition, you may choose to display VU Meters with the source, Tracking Markers (see 8.2.8) and Hot Spot Markers (see Section 8.2.7).
The final Overlay option flips the images
horizontally, useful for a variety of studio requirements such as talent orientation in greenscreen applications (including Hotspot operations).
Note: Certain Overlay menu options are not suitable for all monitor sources, hence are not listed when innapropriate.
Two final items complete the monitor viewport options:
Rename – allows you to supply a custom name to be shown for the monitor viewport (as well as the associated Switcher row button) for sources.
Configure –opens the Input Configuration panel for the corresponding source.
Hint: Double-click a monitor to open the same Input Configuration panel, without having to hunt for the gear or open the menu.

10.1.2 VIEWPORT TOOLS

Media Player and Network viewports provide additional features when you move your mouse pointer over them.
FIGURE 175

Media Player monitors (Figure 175) display handy transport controls – Previous, Play, Stop, and Next As well, a timecode field is shown.
Right-click the time field to open a menu allowing you to Reverse Direction, toggle
Warning Colors, or use Playlist Duration.
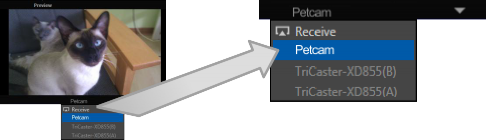
FIGURE 176
Click the triangle button that appears in the titlebar for Network input monitors (Figure 176) to select the active source from a menu listing all those detected.
Just as for other sources, a Configure (gear) button is shown on rolling over these monitor types; clicking it opens the Configuration panel for the related source (see Chapter 8 I/O Configuration, Section 8.2).
Hint: When LiveMatte, Proc Amp, or Crop settings are active for a source, bright green, blue and yellow indicators are lit under its monitor.
< Previous | Contents | Next >