< Previous | Contents | Next >
![]()
Let’s try something different now – using LiveMatte to create a typical ‘weather report’ shot.
(We’ll use a pre-recorded sample clip for this task, but of course if you happen to have a greenscreen studio ready to use, just skip the first three steps below, and select the appropriate Input button on the Switcher’s Program row - instead of a DDR).
1. Change the Switcher’s Program row selection to M/E 1, and enable the BKGD
delegate button in the Transition section of the Switcher.

2. Remove any extraneous DSKs left from earlier operations from view using the local Take buttons in the Switcher’s individual DSK control groups.
3. If necessary, click the Mix Effects label between the Monitor and Switcher
sections (or press ‘m’ on the keyboard) to expand the M/E pane.
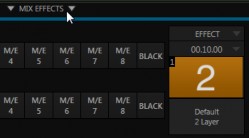
4. Click the tab for M/E 1 to reveal the controls for the first M/E channel.
5. Click the Effect button in the M/E Effect control group (Figure 75). The default effect is named “Default (2 Layer)”; you should see the icon for this effect below the Effect button.
[Otherwise, click the + (Add Media) button that pops up when you move the mouse over the effect name (or, for 4-input TriCasters, to the right of the
effect name), and use the Media Browser to select “Default (2 Layer)” from the Default group in the file pane.]
6. Notice that the left half portion of the M/E panel contains two source (input) rows labeled A and B.
a. Select DDR 1 in the button row labeled A.
b. Select DDR 2 in the B row.
7. Click the DDR 1 tab, and Add the video clip named Kiki 1 Center.mov from the
Green Screen group inside the Clips>NewTek location.
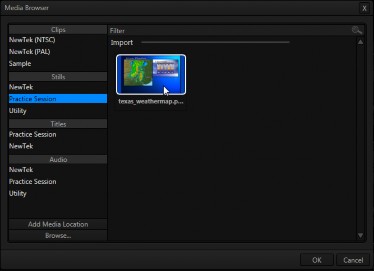
FIGURE 76
8. Click the DDR 2 tab, and add the image named texas_weathermap.png (from Practice Session, under Stills in the Location list at left).
9. Move your mouse pointer over the desktop monitor for DDR 1, and click the Configure button (gear) that pops up at right in the label beneath the monitor.
10. Click the LiveMatte tab in the Configuration panel that opens.
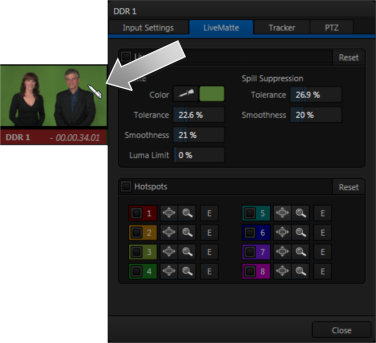
11. Click on the Color button in the Matte section of the panel, and keep the mouse button depressed.
12. Drag the eye-dropper pointer over the green background in the monitor, and then release it (Figure 77). This sets the primary ‘key color’ (LiveMatte is automatically enabled when you select a color).
13. The default LiveMatte settings (Tolerance and Smoothness) are close enough for this little demonstration, so you can close the Configuration panel now.
We’ll look at the details of LiveMatte in more depth in Part II (the Reference section), but already your result (as viewed on Program output) should look very similar to Figure 74. TriCaster doesn’t stop here, though. Let's look a little more closely at TriCaster’s powerful M/Es.