< Previous | Contents | Next >
SECTION 22.4 TRICASTER™ 460 CS & 860 CS
![]()
The principle difference between these two members of the TriCaster family of control surfaces is the number of channels supported by their namesake TriCaster live production system.
TriCaster 860 CS is a bit wider than the 460 CS, as necessary to support the additional channels offered by the larger TriCaster. As well, a few control groups are in slightly different locations on the two control surfaces.
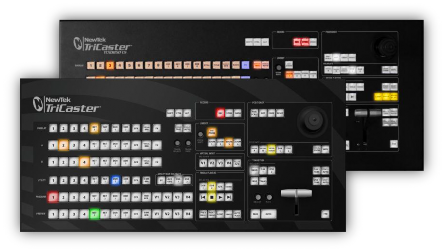
FIGURE 344
Apart from these distinctions, the features of both of these control surfaces correspond very closely, allowing us to treat them simultaneously in the following discussion.
![]()
![]()
The CS control layout closely follows that of the TriCaster user interface, the principle exceptions being that:
1. The M/E control group on the control surface is located above the main
Switcher rows (for comfort).
2. A single Position control group governed by delegate buttons takes the place of multiple controls in the UI.
The controls are comprised of grouped sets including the following hardware types:
Backlit push buttons
Twist knobs
T-bar
3-axis joystick
LED indicators
![]()
![]()

FIGURE 345
The SHIFT and CTRL buttons provided on the control surface support extended features and future expansion. To the extent that these buttons are currently assigned to any feature, they have been described in context.
MACRO
![]()
The last button in this group offers spectacular convenience. A TriCaster macro can be assigned to any button on the control surface in much the same manner as it can be assigned to a keyboard button. The steps are as follows:
5. On TriCaster’s Live Desktop, open the Macro Configuration Editor.
6. Select the macro you wish to assign in the onscreen lister.
7. Click the mouse in the Listen field at bottom left.
8. Hold down the MACRO button and press a suitable button on the control surface.
That’s it – you can close the desktop Macro configuration panel and test the result. To play back the macro at any time, press the MACRO button along with the assigned key.
![]()
22.4.3 DELEGATES AND SYNCHRONIZATION
![]()
Both TriCaster’s Live Desktop and the control surface supply delegate button groups to govern other controls. This is done both to extend the capability of other controls, and to support multi-selections – resulting in simultaneous operations.
When initially selecting multiple delegates, as often as not the settings and states of the individual members selected will vary. For example, when you delegate several M/Es at once, the Overlay Transition Rate of each member of the multi-selection could be different. Generally, wherever it makes sense to do so, when you make adjustments to settings for multi-delegated groups, the settings will be progressively synchronized. For example:
The Zoom Rate for M/E1 is “S”; M/E 2 is set to “M”; M/E 3’s Zoom Rate is “F”.
You multi-delegate these three M/Es.
You push the Zoom Rate button once. The rate for M/E 1 increments to “M”. (M/E 2 and 3 are not affected.)
You push the Zoom Rate button again. The rate for M/E 1 and M/E 2 are incremented to “F”; the Zoom Rate for all three delegated M/Es is now synchronized.
You will see this synchronization method applied to the following controls:
Media Players > Loop, Autoplay and Single
Transition>Rate
Transition>Select
M/E > (Overlay) Trans Rate
M/E > (Overlay) Trans Select
M/E > Zoom Rate
M/E > Overlay display state
![]()
![]()
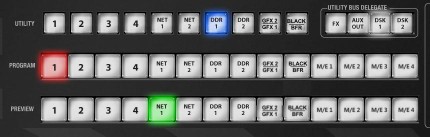
FIGURE 346
PROGRAM AND PREVIEW
![]()
The Program and Preview rows each hold selection buttons as follows:
4. Camera 1 – (4 or 8); press Shift with 1-4 to access Cameras 5-8 when using a 460 CS with an 8-input TriCaster
5. NET 1 and NET 2
6. Media Players:
a. DDR 1 and DDR 2
b. Graphics 1/2
c. BFR (BUFFER)/BLACK
d. M/E 1 - M/E 4 (or M/E 8)
(Press Shift with M/E 1-4 to access M/Es 5-8 when using a 460 CS with an 8-input TriCaster)
Switcher row buttons are mutually exclusive, and the active selection button remains lit.
Hint: Hold down CTRL when clicking a button on the Preview row to toggle LiveMatte on/off for that source. Likewise, hold CTRL + SHIFT while pushing a Preview row button to toggle its Proc Amp. Note that the source need not be actually selected on the PREVIEW row to do this, and multi-selections are supported.
UTIL (UTILITY) ROW
![]()
UTIL row buttons are also mutually exclusive. The subordinate role of the UTIL Row is subtly reinforced by the use of slightly smaller buttons. Source options include:
1. 1 – (4 or 8); Camera inputs
2. NET 1 and NET 2
3. Media Players:
a. DDR 1 and DDR 2
b. Graphics 1/2
c. BFR (BUFFER)/BLACK
Press CTRL + (UTIL row button) to access extended source options for the AUX Out
delegate only:
d. [CTRL + 1] – [CTRL + (4 or 8] → select BFR 1- (4 or 8)
e. [CTRL + NET 1] → select Preview
f. [CTRL + NET 2] → select Program
g. [CTRL + DDR 1] → select Program (Clean)

![]()
UTIL BUS DELEGATE
UTIL BUS DELEGATE (Figure 347) button selections govern which switcher layers the UTIL row is currently controlling; or – from another perspective – which video layers the selected source is assigned to.
The AUX OUT button corresponds to the Output 2 source, while FX controls Switcher or M/E rows delegated to the Green (FX) group.
Note: When possible, all related button selections (and illumination state) are updated to show their current state when new delegate selections are first made. This is true for all delegate groups.
(An exception is made when newly selecting multiple delegates with control settings that do not initially match. For example, if DSK1 and DSK 2 have different sources assigned and are newly multi-selected in the delegate group, no buttons on the UTIL row will light.)
![]()
![]()
The controls in this group (Figure 348) are analogous to those in the eponymous group in user interface, performing the same functions in much the same manner.
(In one deviation from the Live Desktop, switcher layer positioning is provided by a single, shared set of Positioner tools, discussed later.)
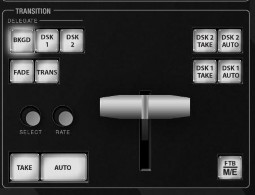
TRANSITION DELEGATE
![]()
As on the Live Desktop, active delegate buttons remain lit. Multiple selections can be performed by pressing one or more buttons at the same time. DELEGATE buttons determine what video layers the main Take, Auto, and T-Bar affect, and the scope of the Select and Rate knobs.
![]()
As a convenience, it is possible to re-purpose the entire TRANSITION control group to control M/Es rather than main Switcher controls.
To do this, press the M/E button at bottom right in this section. While this button is lit, the BKGD and DSK1 delegate buttons, along with other controls in the TRANSITION group that correspond to existing M/E and M/E KEY layers and effects are diverted to the currently delegated M/Es.
Note that when you hold down SHIFT while pressing this button, an FTB (Fade to Black) operation is performed instead. (FTB has no dedicated transition controls; its fade in/out duration is derived from the BKGD transition setting.)
Hint: When FTB is displayed on Program Out, it obscures all other Switcher activity.
TRANSITION BIN CONTROL
![]()
The control surface does not have Transition Bins for the different video layers as such, but can nevertheless control the transition selection and attributes for delegated video layers.
SELECT
When a single layer, such as BKGD, is selected in the TRANSITION DELEGATE group on the control surface, rotating the SELECT knob cycles the current transitions in the Transition Bin for that layer.
When multiple video layers have been delegated, turning SELECT affects the transitions for all layers as follows:
When all delegated layers are currently on the same transition bin 'slot', the selection in the corresponding transition bins simply cycles left or right synchronously.
Otherwise (when the Transition Bin slots for multi-delegated layers are not aligned vertically), rotating the knob moves the selection layer by layer as the knob turns until the selected slots are aligned. From that point, continuing to twist SELECT moves the transition selection in lock step.
The SELECT knob also acts as a push button:
Push SELECT to toggle the Reverse setting for the BKGD transition.
Push SHIFT + SELECT to toggle the Ping Pong switch for the BKGD transition.
RATE
The RATE knob operates in similar fashion to SELECT. Rotate the knob to modify the transition Rate for delegated layers. Or press the knob to cycle through the standard Slow, Medium and Fast presets. Multi-delegate selections are handled the same as for Select (for both twist and push operations).
FADE & TRANS

FIGURE 349
These two buttons provide a quick way to control the Transition Bin selection for the delegated switcher layer(s). The FADE and TRANS (Transition) buttons are mutually exclusive; selecting either one cancels the other, and only the currently active button remains lit.
Pushing FADE offers a quick and convenient way to select the Crossfade transition. Push the TRANS button to activate the last-used transition icons for a video layer (or layers. For new sessions, TRANS jumps to the first transition in the bin.
PERFORMING TRANSITIONS
![]()
Just as in the user interface, the TriCaster control surface provides both local and main transition controls.
MAIN T-BAR, TAKE AND AUTO
These controls correspond exactly to their Live Desktop counterparts, and affect all currently delegated video layers (BKGD, DSK 1, DSK 2, or FTB) at the same time.
Note that two small LEDS are situated near the left side of the T-Bar – one at each extreme of its stroke. When a transition is in progress (or is halted partway), one LED is illuminated. This LED marks which direction to push the T- to complete the current transition.
LOCAL TAKE/AUTO
Local Take and Auto buttons are provided for DSK 1 and DSK 2, but not FTB. These perform a cut or transition respectively, affecting only the corresponding switcher layer.
Hint: When a DSK layer is fully displayed on Program out, its local Take button (on the Live Desktop as well as the control surface) remains lit.
![]()
![]()
This section of the control surface corresponds to the tabbed M/E panes on the Live Desktop. The M/E DELEGATE button group determines which M/E (from the four or eight available) is being controlled.
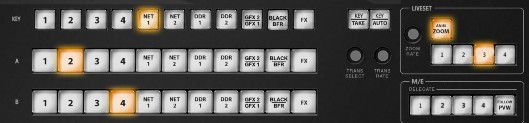
FIGURE 350
In contrast with the Live Desktop, your TriCaster CS adjusts position attributes M/E video layers using a single set of Positioner tools governed by Delegate controls (see Section 22.4.7).
M/E DELEGATE
![]()
Your TriCaster CS provides an M/E DELEGATE button group to govern which M/E(s) are affected by operations. Selected DELEGATE buttons are illuminated and, conveniently, multiple selections are supported. When using a 460 CS with an 8- input TriCaster, add SHIFT with a selection to delegate
FOLLOW PVW
Enabling the FOLLOW PVW button (M/E DELEGATE group) forces the DELEGATE selection to track the Switcher's PVW row selection. This can be very valuable, as it automatically ensures that adjustments you make to settings will affect the M/E that you plan to display next.
INPUT ROWS
![]()
Just as in the Live Desktop, the Overlay row selection determines the source for the Overlay layer of an M/E. However, since the control surface supports selection of multiple M/Es simultaneously, operations can affect more than one M/E at a time.
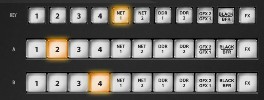
FIGURE 351
Likewise, the A (Input A) and B (Input B) row selections determine the sources for those layers for delegated M/Es. All three rows provide buttons for all camera inputs, Net 1, Net 2, all Media Players (excluding Sound), Virtual Buffer, Black (TriCaster 860 CS only) and FX.
Hint: Punching FX is a quick way to assign the row to the Green (FX) switcher row group.
M/E OVERLAY TRANSITIONS
![]()
KEY TRANSITION SETTINGS
Rotate the TRANS SELECT knob to cycle the transition bin selection through transitions currently available in the (KEY) Transition Bin in the user interface. Rotate the TRANS RATE knob to modify the transition duration. Press the knob to cycle through the standard Slow, Medium and Fast presets.
Hint: Rotate the TRANS SELECT and TRANS RATE knobs with CTRL pressed to assign the A and B rows, respectively, for delegated M/E(s) to color groups.
TAKE, AUTO AND KEY
For an M/E In Mix mode, the TAKE and AUTO perform the named operation between A and B input layers, treating the former as “program” and the latter as “preview” sources.
Press SHIFT + TAKE to show or hide the KEY layer(s) for currently delegated M/Es. Similarly, SHIFT + AUTO will transition the selected KEY(s) using the individual effects selected for delegated M/Es.
Hint: See also the sub-heading “M/E | FTB” in Section 22.4.5 for information on using main Switcher controls to govern M/Es.
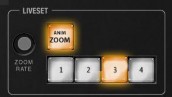
FIGURE 352
![]()
LIVESET ZOOM
The buttons labeled ZOOM 1-4 select one of the first four Zoom Presets for the currently delegated M/Es. Add the SHIFT button to access presets 5-8. The ANIM ZOOM button toggles the CUT (Duration) option for delegated M/Es. When ANIM ZOOM is enabled, pressing an unselected zoom preset button initiates a smooth zoom
from the current level to the new level. Preset selection applies directly to all delegated M/Es.
If you push a zoom preset button a second time at any point, the animated zoom will ease-out and stop. Press it again to re-commence the zoom and complete it.
The duration of animated zooms is determined by the ZOOM RATE setting. Rotate the knob to modify the duration of the effect, or push it to jump to a preset duration (Slow, Medium or Fast).
![]()
![]()
FIGURE 353
POSITIONER DELEGATE
![]()
The Positioner section allows you to adjust position attributes for different overlays and video layers using the Joystick. The DELEGATE group includes seven buttons. In some cases, the scope of application for a DELEGATE selection is further modified by button selections in other sections of the control surface.
For example:
The M/E A and B buttons delegate Joystick operations to Input A and Input B
of the M/Es currently selected in the M/E DELEGATE group.
Similarly, the M/E KEY button assigns the Joystick to control position attributes for the KEY layer of currently delegated M/Es.
Again, selecting VIRTUAL ZOOM tells the Joystick to control the zoom level of the currently delegated M/Es. The joystick mode buttons (such as POS/SCALE, discussed shortly) are not lit when the POSITIONER DELEGATE selection is VIRTUAL ZOOM.
Use the joystick to control Virtual Zoom as follows:
o To zoom in:
Push the joystick forward (as viewed from above), or twist the joystick clockwise.
o To zoom out:
Pull the joystick back (as viewed from above, or twist the joystick counter-clockwise.
Push SHUTTLE to delegate the joystick to shuttle the Media Player(s) currently selected in the MEDIA PLAYERS DELEGATE group. Use CTRL with the joystick for slower and more accurate shuttle speed. Joystick mode buttons are not lit when SHUTTLE is delegated.
Use the joystick to control Virtual Zoom as follows:
o To shuttle delegated Media Players, move the joystick horizontally (as viewed from above).
The DSK 1 and DSK 2 delegate buttons provide direct selection for these video layers, and are not modified by selections elsewhere.
Note: Two of the delegates (VIRTUAL ZOOM and SHUTTLE) are set apart from their siblings. This is because neither of these options supports multi-selection (with other Positioner delegates) like the rest. (Nevertheless, you can zoom multiple M/Es simultaneously when these are selected in the M/E DELEGATE group, or shuttle several delegated Media Players.)
JOYSTICK MODES
![]()
Generally, changes resulting from joystick operations are governed by the current Joystick Mode. Mode selections are mutually exclusive (only one buttons is illuminated at a time).
Also note that when the active Positioner DELEGATE is either Virtual Zoom or
Shuttle, the Joystick Mode is irrelevant, and is ignored.
POS/SCALE
Move the joystick horizontally, vertically or diagonally (as viewed from above) to move delegated video source(s) on its X and Y axes.
Twist the joystick clockwise to scale delegated source(s) up, or counter- clockwise to scale down.
Hint: When multi-delegate selections are active for the Positioner, adjustments are generally relative to the current state for individual delegates, as opposed to absolute.
ROT (ROTATE)
When the POSITIONER DELEGATE selection is anything other than VIRTUAL ZOOM or SHUTTLE:
Move the joystick horizontally (as viewed from above) to rotate delegated sources on the Y axis.
Move the joystick vertically to rotate delegated sources on the X axis.
Twist the joystick clockwise/counter-clockwise to rotate delegated sources on the Z axis.
CROP
Except when the POSITIONER DELEGATE selection is VIRTUAL ZOOM or SHUTTLE:
Twist the joystick clockwise (as viewed from above) to crop delegated sources inward on all 4 edges, maintaining the original aspect ratio.
Twist the joystick counter-clockwise to reduce cropping of delegated sources on all 4 edges.
Move the joystick horizontally to crop only the left edge of delegated sources.
Move the joystick horizontally with the joystick button pressed to crop only the right edge of delegated sources.
Move the joystick vertically to crop only the top edge of delegated sources.
Move the joystick vertically with the joystick button pressed to crop only the bottom edge of delegated sources.
Hint: For finer control, hold down CTRL when operating the joystick. This will increase its sensitivity by a factor of 10.
RESET
Despite its location, RESET is really an action button (not a Joystick mode). Press it to restore all position settings for currently delegated source(s) to their defaults. (This is also why RESET does not stay selected when pressed, nor does it change the current Joystick mode.
The two special delegate selections also work differently with RESET:
When VIRTUAL ZOOM is delegated, the Zoom preset for delegated M/Es) is reset to the #1 preset.
When SHUTTLE is delegated, selected Media Players are reset to the starting point of the current item (or playlist).
MONITORING
![]()
While using the joystick in most POSITIONER DELEGATE modes, many adjustments are temporarily shown on the Live Desktop’s Preview monitor.
The Preview monitor reverts to its default display a few moments after releasing the joystick to its at-rest position.
![]()

![]()
22.4.8 MEDIA PLAYER GROUP
MEDIA PLAYER DELEGATE
![]()
The MEDIA PLAYER DELEGATE group contains buttons for TriCaster’s DDR 1, DDR 2, Graphics (455 CS), STILL and TITLE (855 CS), and SOUND modules. This selection determines which Media Player is being controlled at the moment. (Support for multi-selection allows you to do things like start and stop both DDRs at the identical moment.)
PREV/NEXT PRESET
![]()
These two buttons let you to cycle backwards or forwards respectively through existing presets for the delegated Media Player.
TRANSPORT CONTROL
![]()
| (Previous Item) – Press this button to go to the previous playlist entry in delegated Media Players. (The selection cycles to the last playlist entry when necessary.)
(Stop) – Push once to end playback for delegated Media Players; push a second time to return to the start position (this operation respects the Single setting for individual Media Players
(Play) – Push to initiate playback for delegated Media Players.
| (Next Item) – Push this button to go to the next playlist entry in delegated Media Players. (The selection cycles to the first playlist entry when necessary.)
MEDIA PLAYER OPTIONS
![]()
LOOP, SINGLE, and AUTOPLAY are mode buttons, and toggle the respective settings for all delegated Media Players as appropriate (for example, Sounds has no Autoplay feature, so logically AUTOPLAY does not affect it).
![]()
![]()
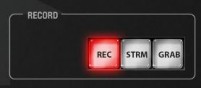
FIGURE 355
Three buttons labeled REC, STRM, and GRAB are located in the RECORD group.
REC – Pressing this button enables TriCaster's Record feature. As a safety measure, pressing the REC button when recording is underway does not stop recording. Instead, the CTRL button flashes to reminds you that you must hold the CTRL button down while pushing REC to end recording.
STREAM – Push to enable or disable TriCaster’s live streaming feature.
GRAB – Push to store a still imaged grabbed from Program output using TriCaster's Grab feature.
![]()
![]()
Joystick control over pan, tilt, and zoom for connected robotic cameras is also provided.
Note: Joystick operations do not affect stored PTZ preset values.
To delegate the joystick to control a PTZ camera assigned to a specific TriCaster input, hold down SHIFT button on the control surface and press a button in the M/E Delegate group. (Afterward, the button corresponding to the current PTZ camera selection will light whenever SHIFT is pressed.)
Pan: With SHIFT depressed, tilt the joystick left-right.
Tilt: With SHIFT depressed, tilt the joystick backward-forward.
Zoom: With SHIFT depressed, twist the joystick clockwise or counter- clockwise.
Focus: When Auto is off, and with SHIFT + CTRL both pressed, twist the joystick clockwise or counter-clockwise.
o Auto Focus toggle: With SHIFT + CTRL held down, press the joystick button.
Preset selection:
o Use CTRL + LIVESET SHOT (1-4); add SHIFT to the above for presets (5-8).
Press CTRL + LIVESET ZOOM RATE to adjust the camera’s Animation Speed.
Hold down SHIFT and press the top joystick button to update the current
PTZ preset (position, zoom and thumbnail icon).
![]()
![]()
AirSend™ is the software API (application programming interface) providing network A/V support in NewTek products (see Section 17.6). Various systems and software (both native and third-party) can take advantage of AirSend to send and receive control instructions. As one example, NewTek’s own 3Play™ instant replay natively systems support AirSend.
AirSend commands have pre-assigned to TriCaster 8000CS. The following table lists control combinations that trigger AirSend operations and provides both a brief description of each operation and, for reference, the AirSend command invoked.
Control Operation | Description | AirSend Command |
Ctrl + M/E row A (1-16) | Net 1: Store index 1-16 | CLIP_STORE INDEX=Net1_1-16 |
Ctrl + Shift + M/E row A (1-16) | Net 1: Restore index 1- 16 | CLIP_RESTORE INDEX=Net2_1-16 |
Ctrl + M/E row B (1-16) | Net 2: store index 1-16 | CLIP_STORE INDEX=Net2_1-16 |
Ctrl + Shift + M/E row B (1-16) | Net 2: restore index 1- 16 | CLIP_RESTORE INDEX=Net2_1-16 |
Shift + (Player) PREV | Net 1: Previous page | CLIP_MOVE DISTANCE=-1 |
Shift + (Player) STOP | Net 1: Stop | CLIP_PLAY SPEED=0.0 |
Shift + (Player) PLAY | Net 1: Play | CLIP_PLAY SPEED=1.0 |
Shift + (Player) NEXT | Net 1: Next page | CLIP_MOVE DISTANCE=1 |
Shift + (Player) PREV PRESET | Net 1: Jump 4s backward | CLIP_SCRUB DISTANCE=-4 |
Shift + (Player) NEXT PRESET | Net 1: Jump 4s forward | CLIP_SCRUB DISTANCE=4 |
Ctrl + (Player) PREV | Net 2: Previous page | CLIP_MOVE DISTANCE=-1 |
Ctrl + (Player) STOP | Net 2: Stop | CLIP_PLAY SPEED=0.0 |
Ctrl + (Player) PLAY | Net 2: Play | CLIP_PLAY SPEED=1.0 |
Ctrl + (Player) NEXT | Net 2: Next page | CLIP_MOVE DISTANCE=1 |
Ctrl + (Player) PREV PRESET | Net 2: Jump 4s backward | CLIP_SCRUB DISTANCE=-4 |
Ctrl + (Player) NEXT PRESET | Net 2: Jump 4s forward | CLIP_SCRUB DISTANCE=4 |