< Previous | Contents | Next >
![]()
![]()
![]()
External audio and video sources are connected to the appropriate inputs on TriCaster’s backplate.
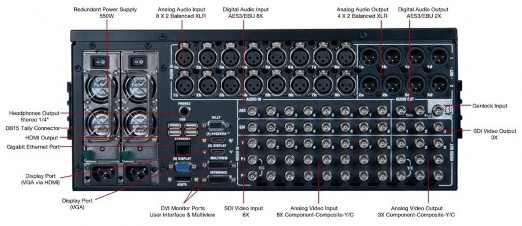
FIGURE 13 – TRICASTER 8000
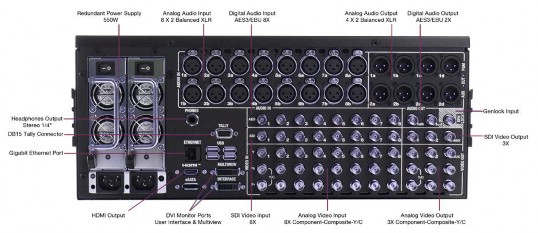
FIGURE 14 - TRICASTER 860
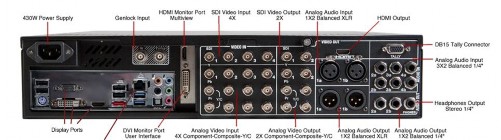
FIGURE 15 – TRICASTER 460
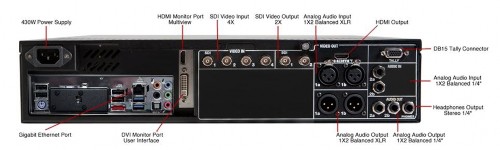
FIGURE 16 – TRICASTER 410
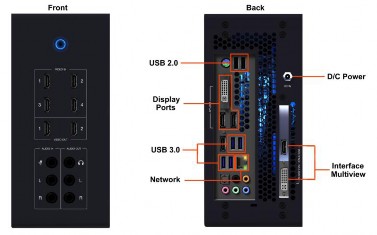
FIGURE 17 – TRICASTER MINI
Note: Hardware details as depicted are subject to change without prior notice.
If your equipment supports SDI, this is the best quality option.
1. Connect sources to suitable connectors in the VIDEO IN section: SDI, HDMI (TriCaster Mini only), Component, Y/C (S-Video), or Composite (may require RCA> BNC adapter).
a. SDI – Attach your SDI source connectors to one of the BNC connectors in the Video In group marked SDI.
b. HDMI (TriCaster Mini only) – Connect your HDMI source cables to HDMI inputs on the front of the unit.

SDI Recommendations:
It’s worth mentioning here that SDI, while ideal for many purposes, does nevertheless have some limitations.
We do not recommend cable runs exceeding 100 meters (for HD; or double that for SD). Transmission over greater distances may result in signal losses, and call for measures to boost levels, which may in turn introduce added latency into the signal path before TriCaster.
Note: that the analog video input connection options listed next are not provided by TriCaster 410 or Tricaster Mini.
c. Component – Attach the appropriate BNC connectors from your sources to all three analog BNC connectors (labeled Y, Pb and Pr) in a column of the Video In group.
d. Y/C – If your S-Video equipment and cabling has the usual 4-pin mini-DIN connectors, you will need an S-Video to dual BNC adapter.
To connect Y/C sources, attach the Y (luma) connector of your source to the second analog BNC connector (labeled Pb). Attach the source’s C (chroma) connector to the bottom connector (labeled Pr).
e. Composite – Attach the composite source’s connector (may require use of an RCA to BNC adapter) to the connector in the input row labeled Y).
Note: The broadcast video standard (such as NTSC, NTSC-J or PAL) of all video sources connected for a given session must match.
2. To input analog audio along with the video, connect the desired audio sources to the (XLR or ¼”) connectors as provided in the Audio In group.
We’ll discuss audio Connection Type options a bit later, in Section 3.13.
Note: SDI or HDMI video sources with embedded audio do not necessarily require separate analog audio connections.
![]()